Light Show Overview
This is cross-posted to my website which is all about my holiday light shows; if this is of interest, check out Wicked Fox Lights
Since I didn’t update my light show this year and am just running exactly the same show, I figured I should do something with it, and documentation counts! Besides, it doesn’t hurt that I’ve been asked for an overview, so may as well take the opportunity! The main goal of this is not to be “how to make a light show”, but more along the lines of “what goes into my light show”. Of course, it could serve as a starting point for folks who want to get into it, at the very least understanding the roles of the various components involved.
There’s a few different ways to approach this, but I think I’ll describe my system in the way that I learned and built it up over the years. I’ll start at the software layer, then follow that out step by step to the pixels on the house. However, please note that I’m not going to go into huge (any?) detail about what props, pixels, how it’s all built, stored, etc.; I’m just going to focus more on the main components that let it happen.
Software and Design
I think this is a great place to start because it’s “free” (at least, for some definition of “free”). In this case, what we’ll be working with is the sequencing software called xLights. There are other systems that exist out there, but from basically everything I’ve seen, xLights is as close to a standard as it gets. It’s also open-source software and is absolutely free to use. The developers provide a weekly update basically year round, and there have been a lot of improvements in the several years I’ve been using it.
xLights performs three different functions in my light show and a special bonus function that I don’t use:
- Design and layout of the show
- Sequencing of individual songs
- Mapping of software pixels to real-life pixels
- (bonus) scheduling and running the light show
Layout
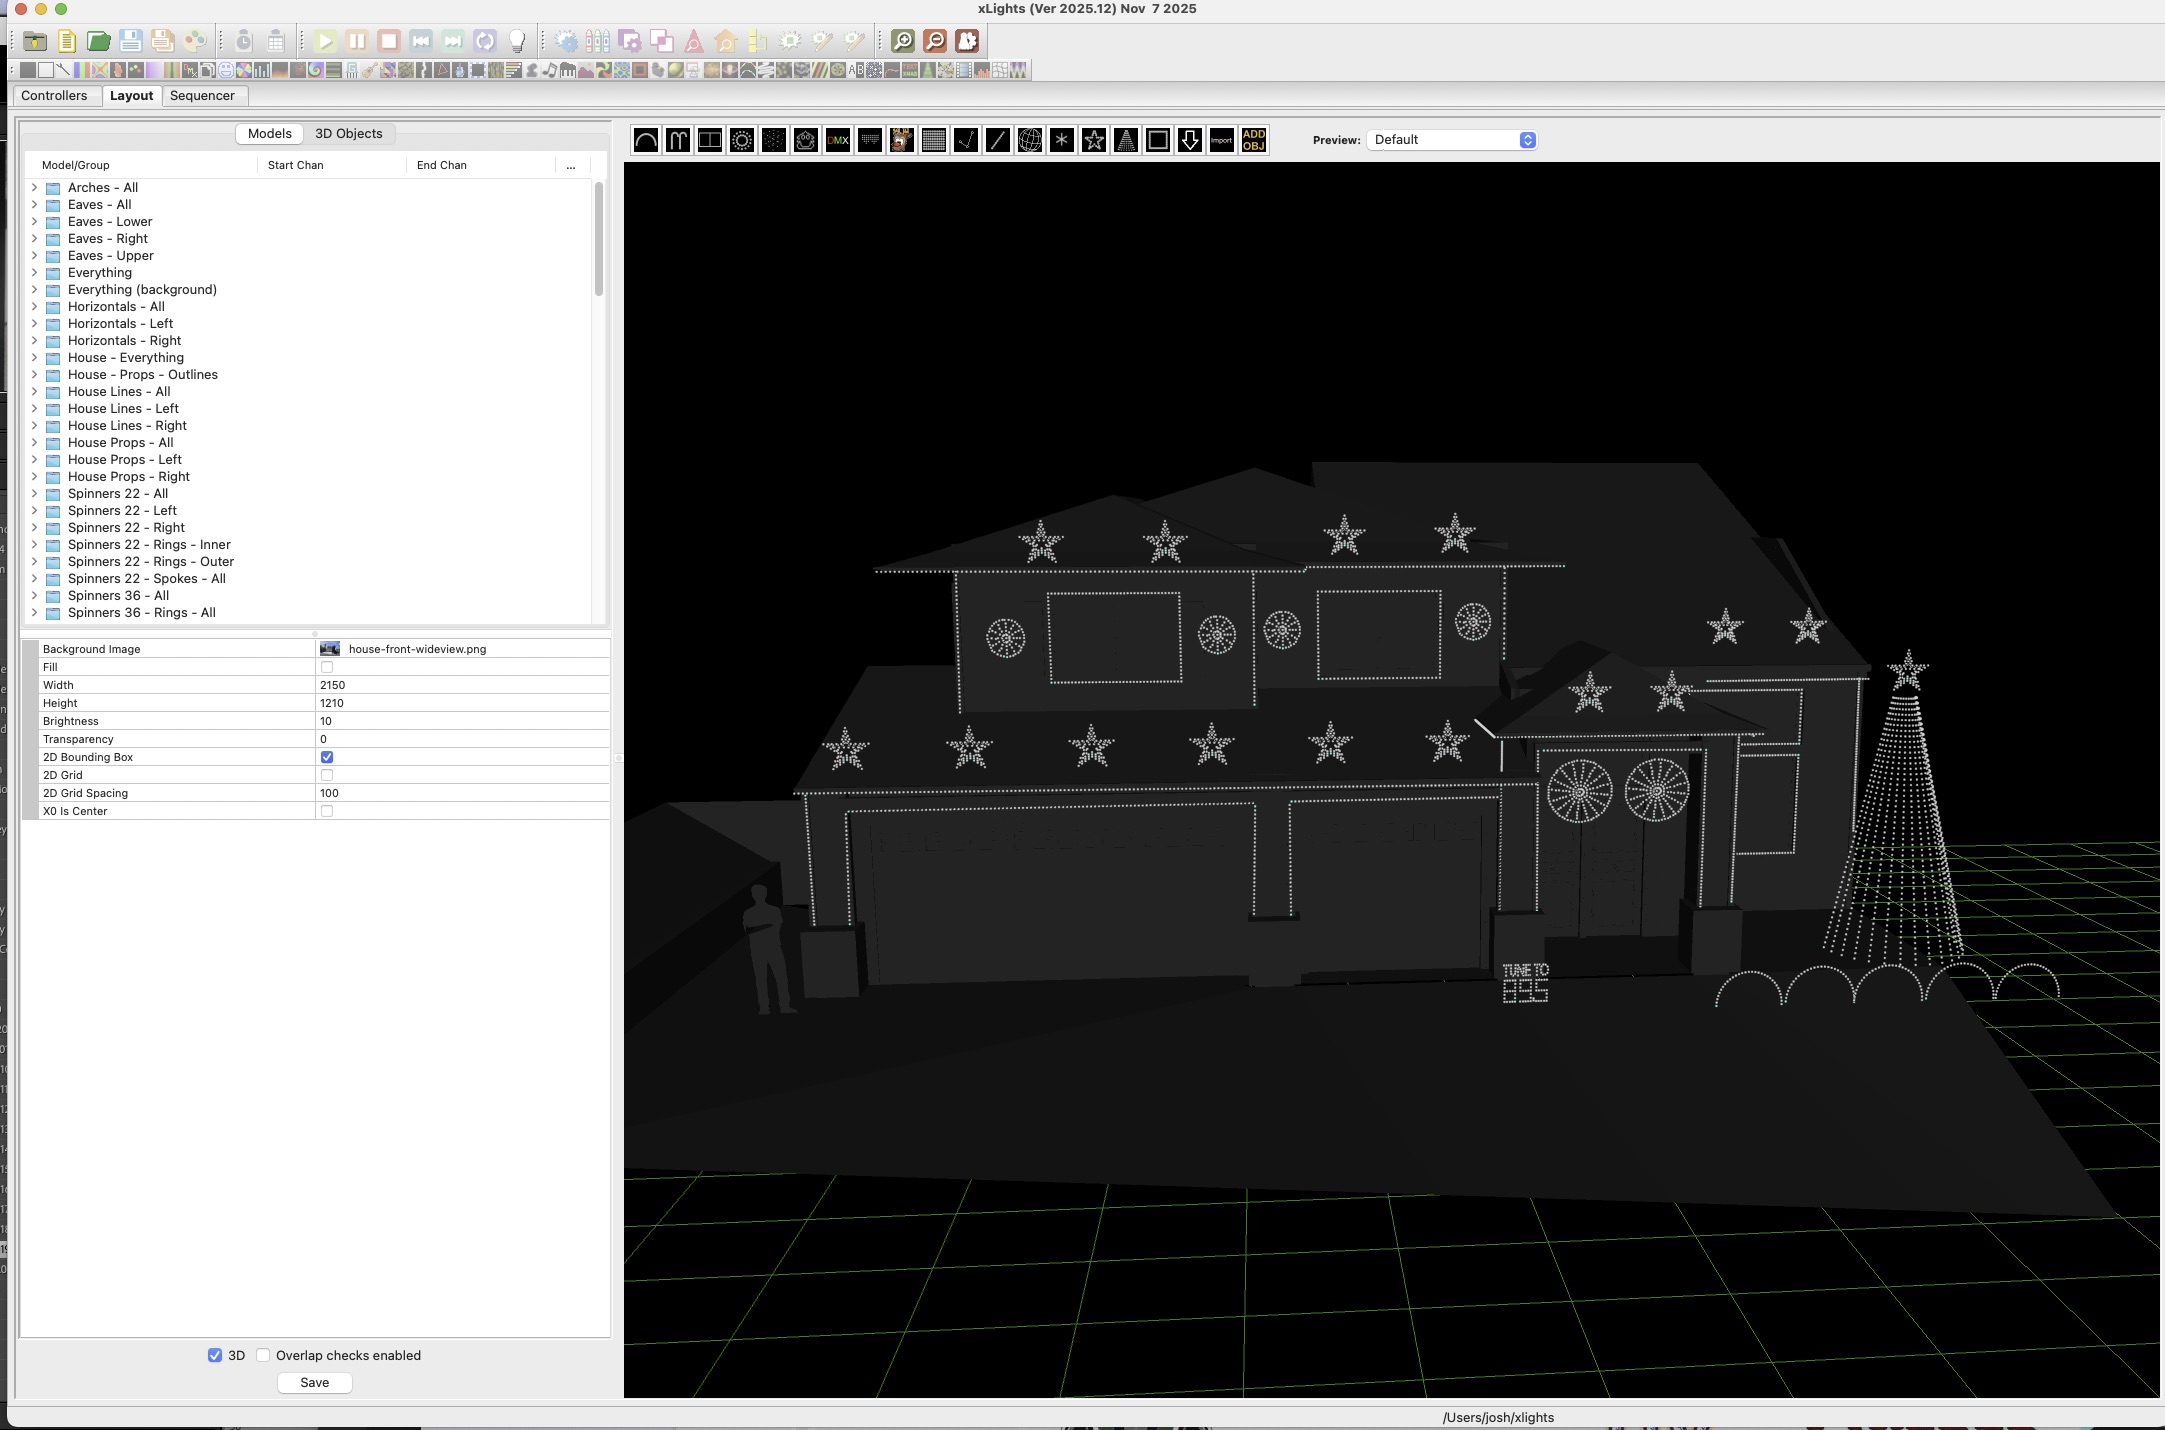
The first thing you’ll need to do in xLights is to design your light show. Drop a picture of your house into the app then start adding as many or as few props as you’d like (a “prop” being a single element of your show, like a single star, candy cane, line of lights on your eaves, etc). There are a lot of generic props you can use, or you can download the layouts for specific props you can buy from places like HolidayCoro, Gilbert Engineering, or Boscoyo Studio. This part is completely free and can help you plan what your show will look like so you can decide what props to buy.

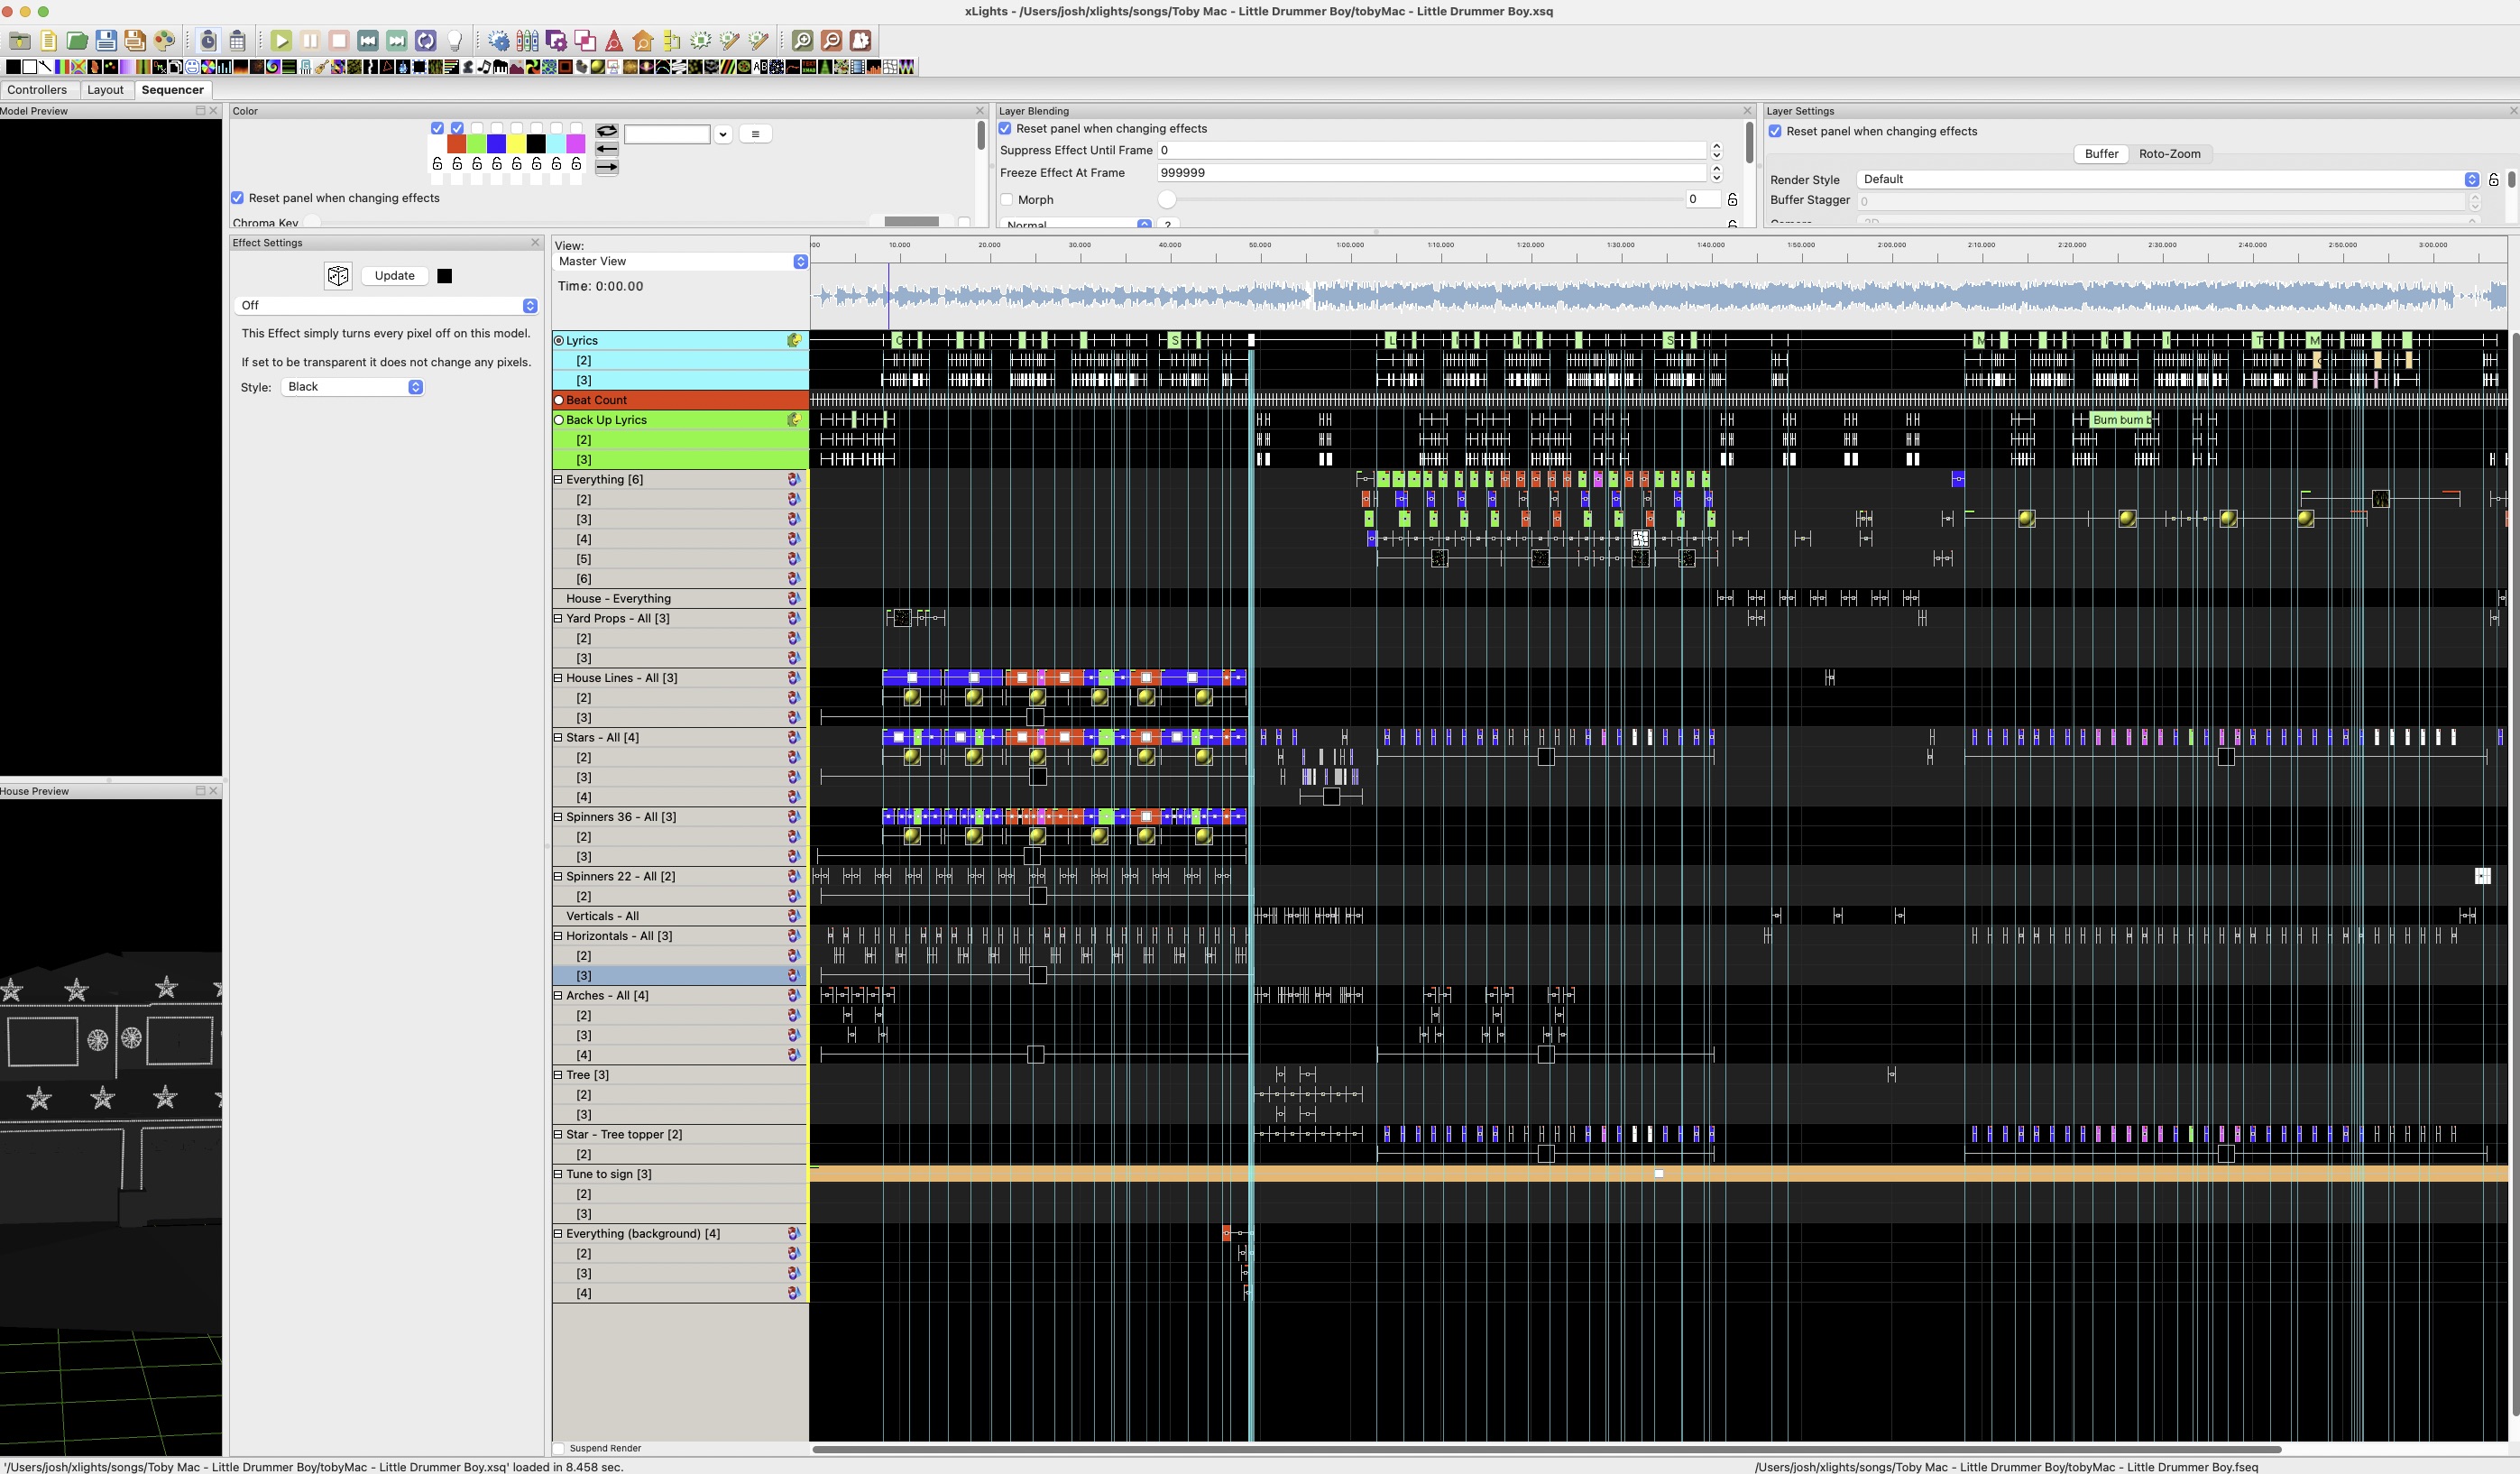
Sequencing
This part comes next because it is still free, but you can certainly spend money on it. On the “Sequencer” tab in xLights, you can create a new sequence based on an mp3 that you have available. xLights will parse that mp3 and put it in a timeline view, not dissimilar to video editing. You’ll then bring whichever props you want to control onto the timeline as layers, then start assigning effects from effects selection and setting up the timing. This can be a very short or very long process, depending on how intricate you want to be; indeed, if you draft all your own sequences, this may be the part which takes the most time. On the other hand, this is arguably the most impactful, because a good sequence on a bad display is more likely to impress than a bad sequence on a good display.
Full disclosure, I’ve only created 5 or 6 of my own sequences, simply because it can be pretty complex and I don’t feel that I have the creative juice in that way. The shortest took around 4 hours to do because I was just kinda slapping stuff together (but it still has to be timed perfectly!), and the longest took me closer to 12 hours because I was still learning the process. However, here’s two that I’m particularly proud of; the first is my latest and took around 8 hours, the second took closer to 12 and was at my old house (editor’s note; just re-watched the second one and it might be a bit much… just sayin.)
Typically I end up looking for sequences from other people who have more desire to do this. This is where money can come into it. There are some share sites with free sequences, such as xLights Sequences or Listen to our Lights, though I’ve found the quality can be hit or miss. I’ve used a couple of these as starting points, just to kinda fill in the song, then I can go back and edit the sequence to fit more what I want it to be. There’s also pay sites which can charge anywhere from $10 to $150 for a single sequence. Magical Light Shows is top of the game here (run by Tom Betgeorge who has probably the best light shows on YouTube), but I also buy from RGB Sequences, BF Light Shows, and others.
One thing all of these have in common is that you will have to import and adapt them to your own layout. xLights makes it straighforward to do and there are tutorials on YouTube about how to do this. Also, you’re fully able to tweak the sequence how you want; it’s on your computer and everything is tweakable, so have fun with it!
When complete, you’ll run a render which basically creates a binary file which tells every pixel what color it should be 40x per second. That will get sent to the controllers, but mapping needs to come first.
Mapping
By this point, you may not have spent any money, and technically you don’t have to in order to do this…. but it doesn’t really make sense to do this without some hardware. This will technically come later in the process but this is my post and I’m keeping xLights stuff altogether, so there.
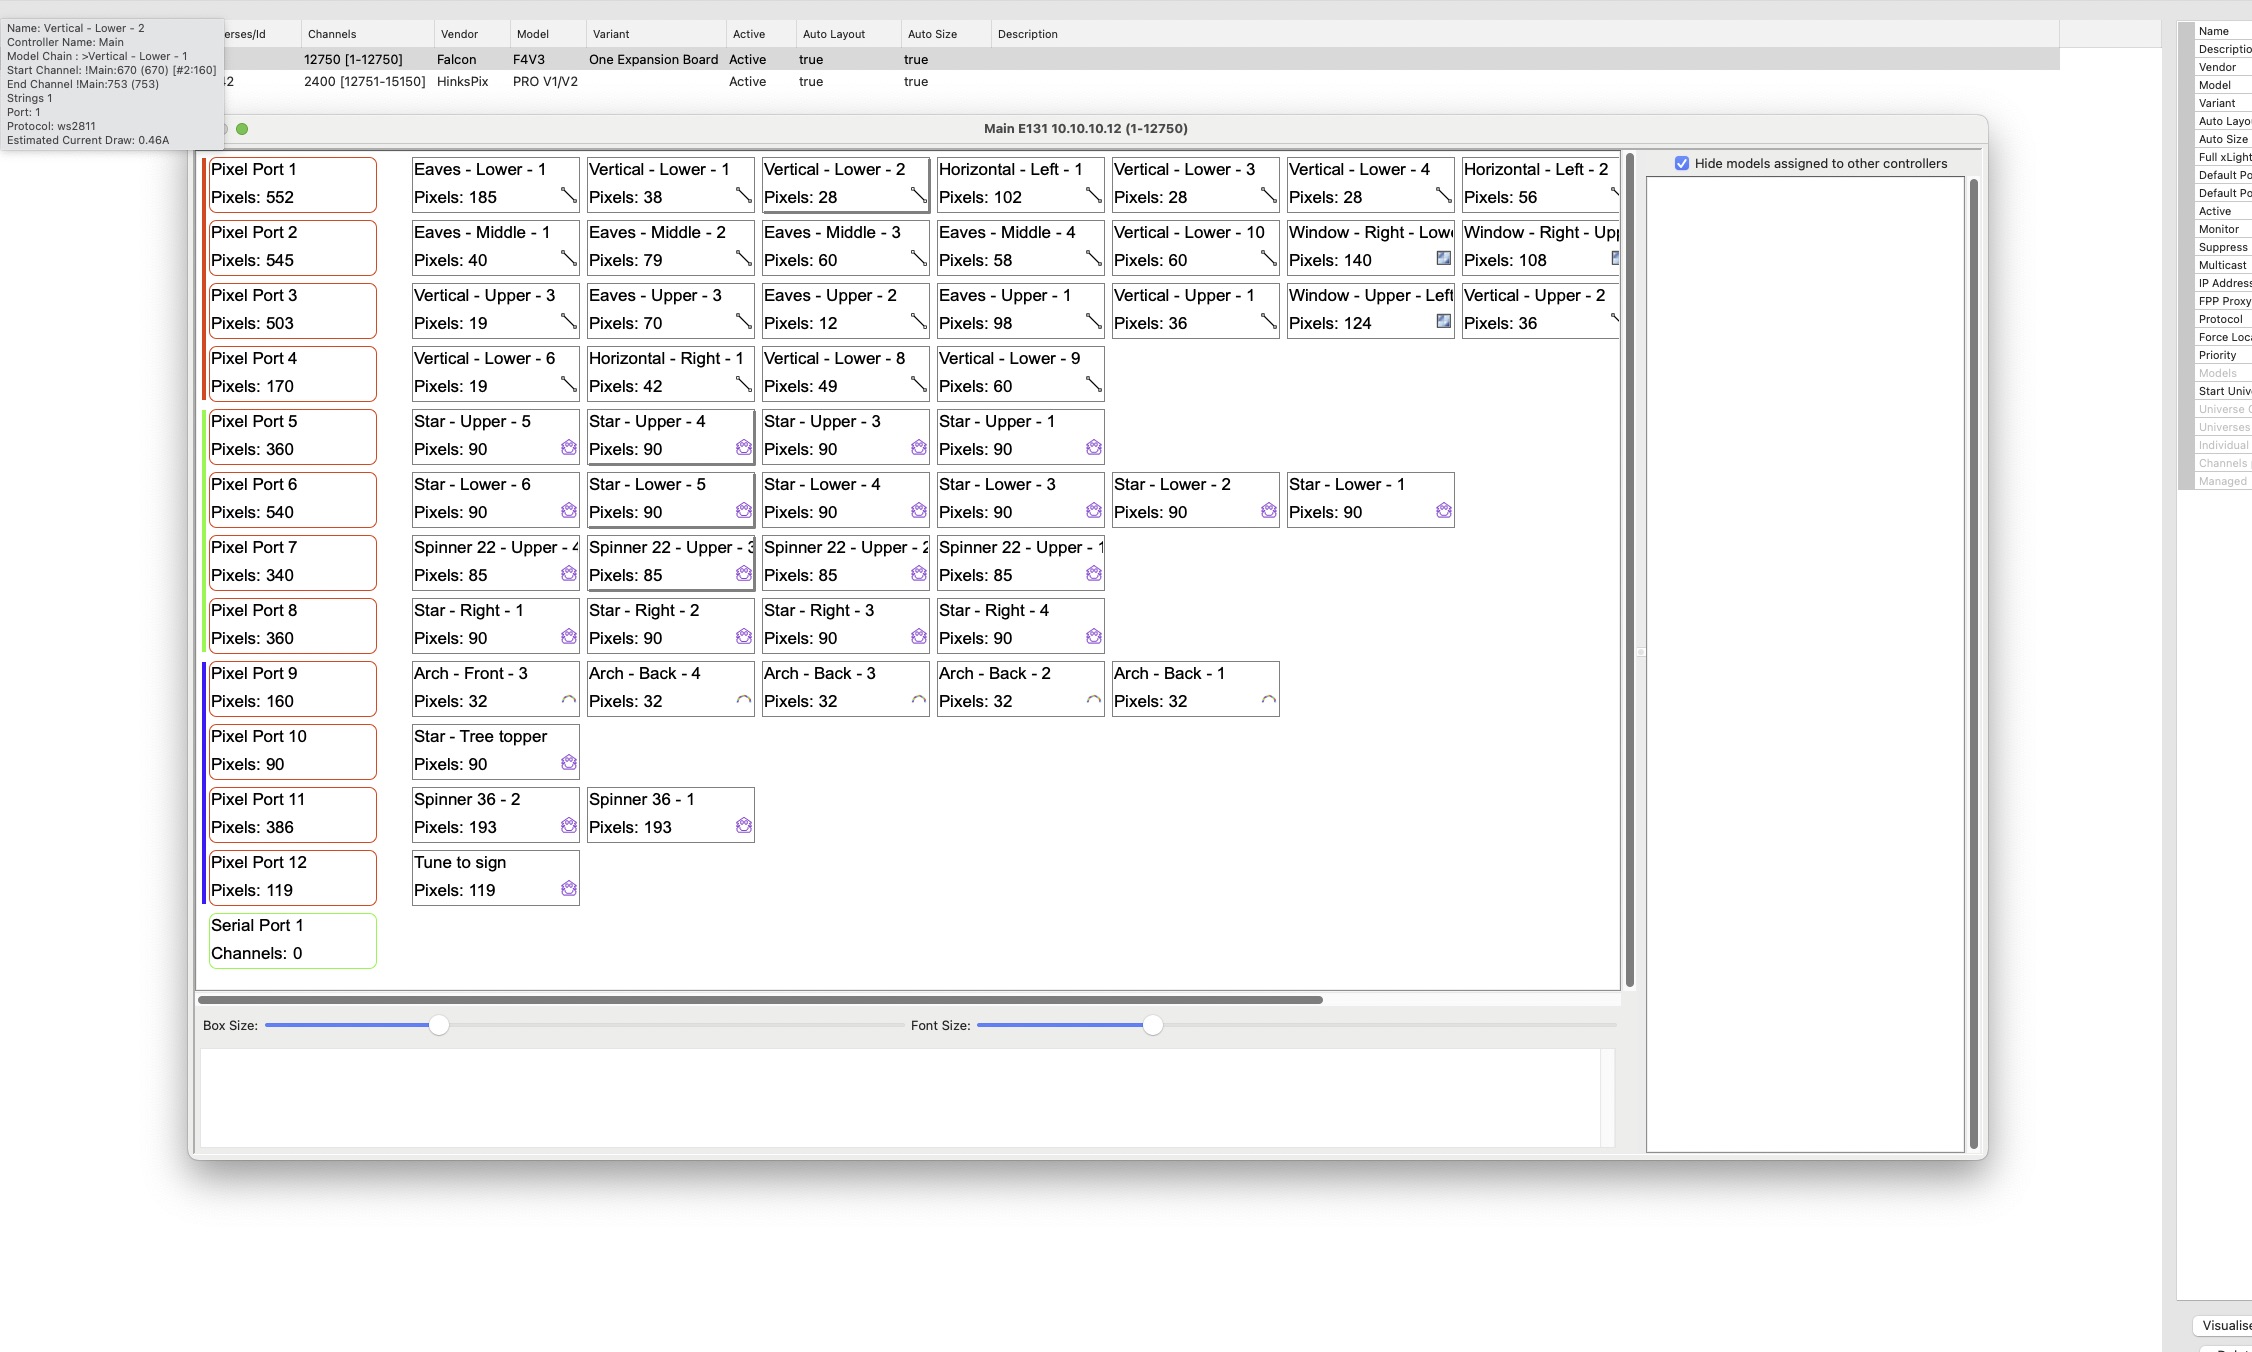
Mapping is the process by which you tell xLights where your lights actually live. Really briefly, every pixel is made up of 3 channels: R, G, B. So for 3 pixels, you’ll have 9 channels, one for R, G, and B for each of the pixels. All this data is sent down the same wire, and each pixel takes the next three integers of data for its three channels, then sends the rest of the packet to the next pixel (or something like that). Thus, xLights has to organize the entire display into effectively a single line of pixels, based on the pixel order in each prop. However, since the pixels process the signal in serial, and since there’s some latency involved in each pixel’s processing, there’s an upper limit to the number of pixels in a line in order to hit fps targets. I target 40fps, and the upper limit for that is ~670 pixels, so I try to target 650 pixels just for some breathing room.
Now, my display has around 5000 pixels, so in order to allow for displays larger than ~670 pixels at a high frame rate, hardware allows for individual ports to be processed in parallel. And this is where the mapping comes in: the mapping portion sets up where the props are in relation to each other; which prop is the first on a particular channel, which comes second, etc. Without this step, xLights would have no idea how to organize the binary data which is rendered and provided to the controllers.
Hardware
Okay, so now we’re spending money. What are we spending it on? Well, pixels and props, obviously. But what else do we need? Here’s what I have in my system, why I have it, and what I’d replace it with (if appropriate). There’s two main places I have hardware, under my eaves and attached to the pole for my tree.
Scheduler and Main Controller
I mentioned earlier that one could use xLights as a controller, and that’s true. However, I don’t have a good way to run a wired connection from my computer to my light show controllers, so I don’t use that functionality. I want to keep it wired between the main controller and the subcontrollers so wifi hiccups don’t end up making things go out of sync. (there are ways to incorporate wifi, basically giving each subcontroller a copy of the sequences and using wifi to just perform synchronization operations, but I prefer all wired).
For this role, I use a Raspberry Pi 4 running Falcon Player. It has full playback controls, allowing you to run and stop sequences as well as set up different playlists, schedule what time you want them to run, etc. xLights seamlessly hooks into Falcon Player and uploads all the necessary stuff (music, sequence, video, etc) that each sequence needs. Falcon Player also acts as the main show controller, storing the rendered sequences and sending the correct data to the appropriate subcontrollers.
My Pi connects via wifi to my home network and to the show network via ethernet; I have a network switch connecting the pi to the two subcontrollers. Interestingly, the Falcon Player also acts as a network proxy to the subcontrollers so I can log into them directly if I need to do some configuration changes.
Also in the box are the network switch (bottom left) and FM Radio Transmitter (top right)

Finally, I have a dual outdoor-rated smart switch for turning on the light show subcontrollers and the Falcon Player separately. I used to use Falcon Player exclusively to schedule and control the light show, but I’ve since ported everything into Home Assistant through the Falcon Player’s MQTT integration. This way my schedules are all in the same place and I have the ability to integrate with other stuff should I need to.
Subcontrollers
I have two subcontrollers: one for my tree since I got the tree as a part of a kit, and one for the rest of my show.
Tree controller
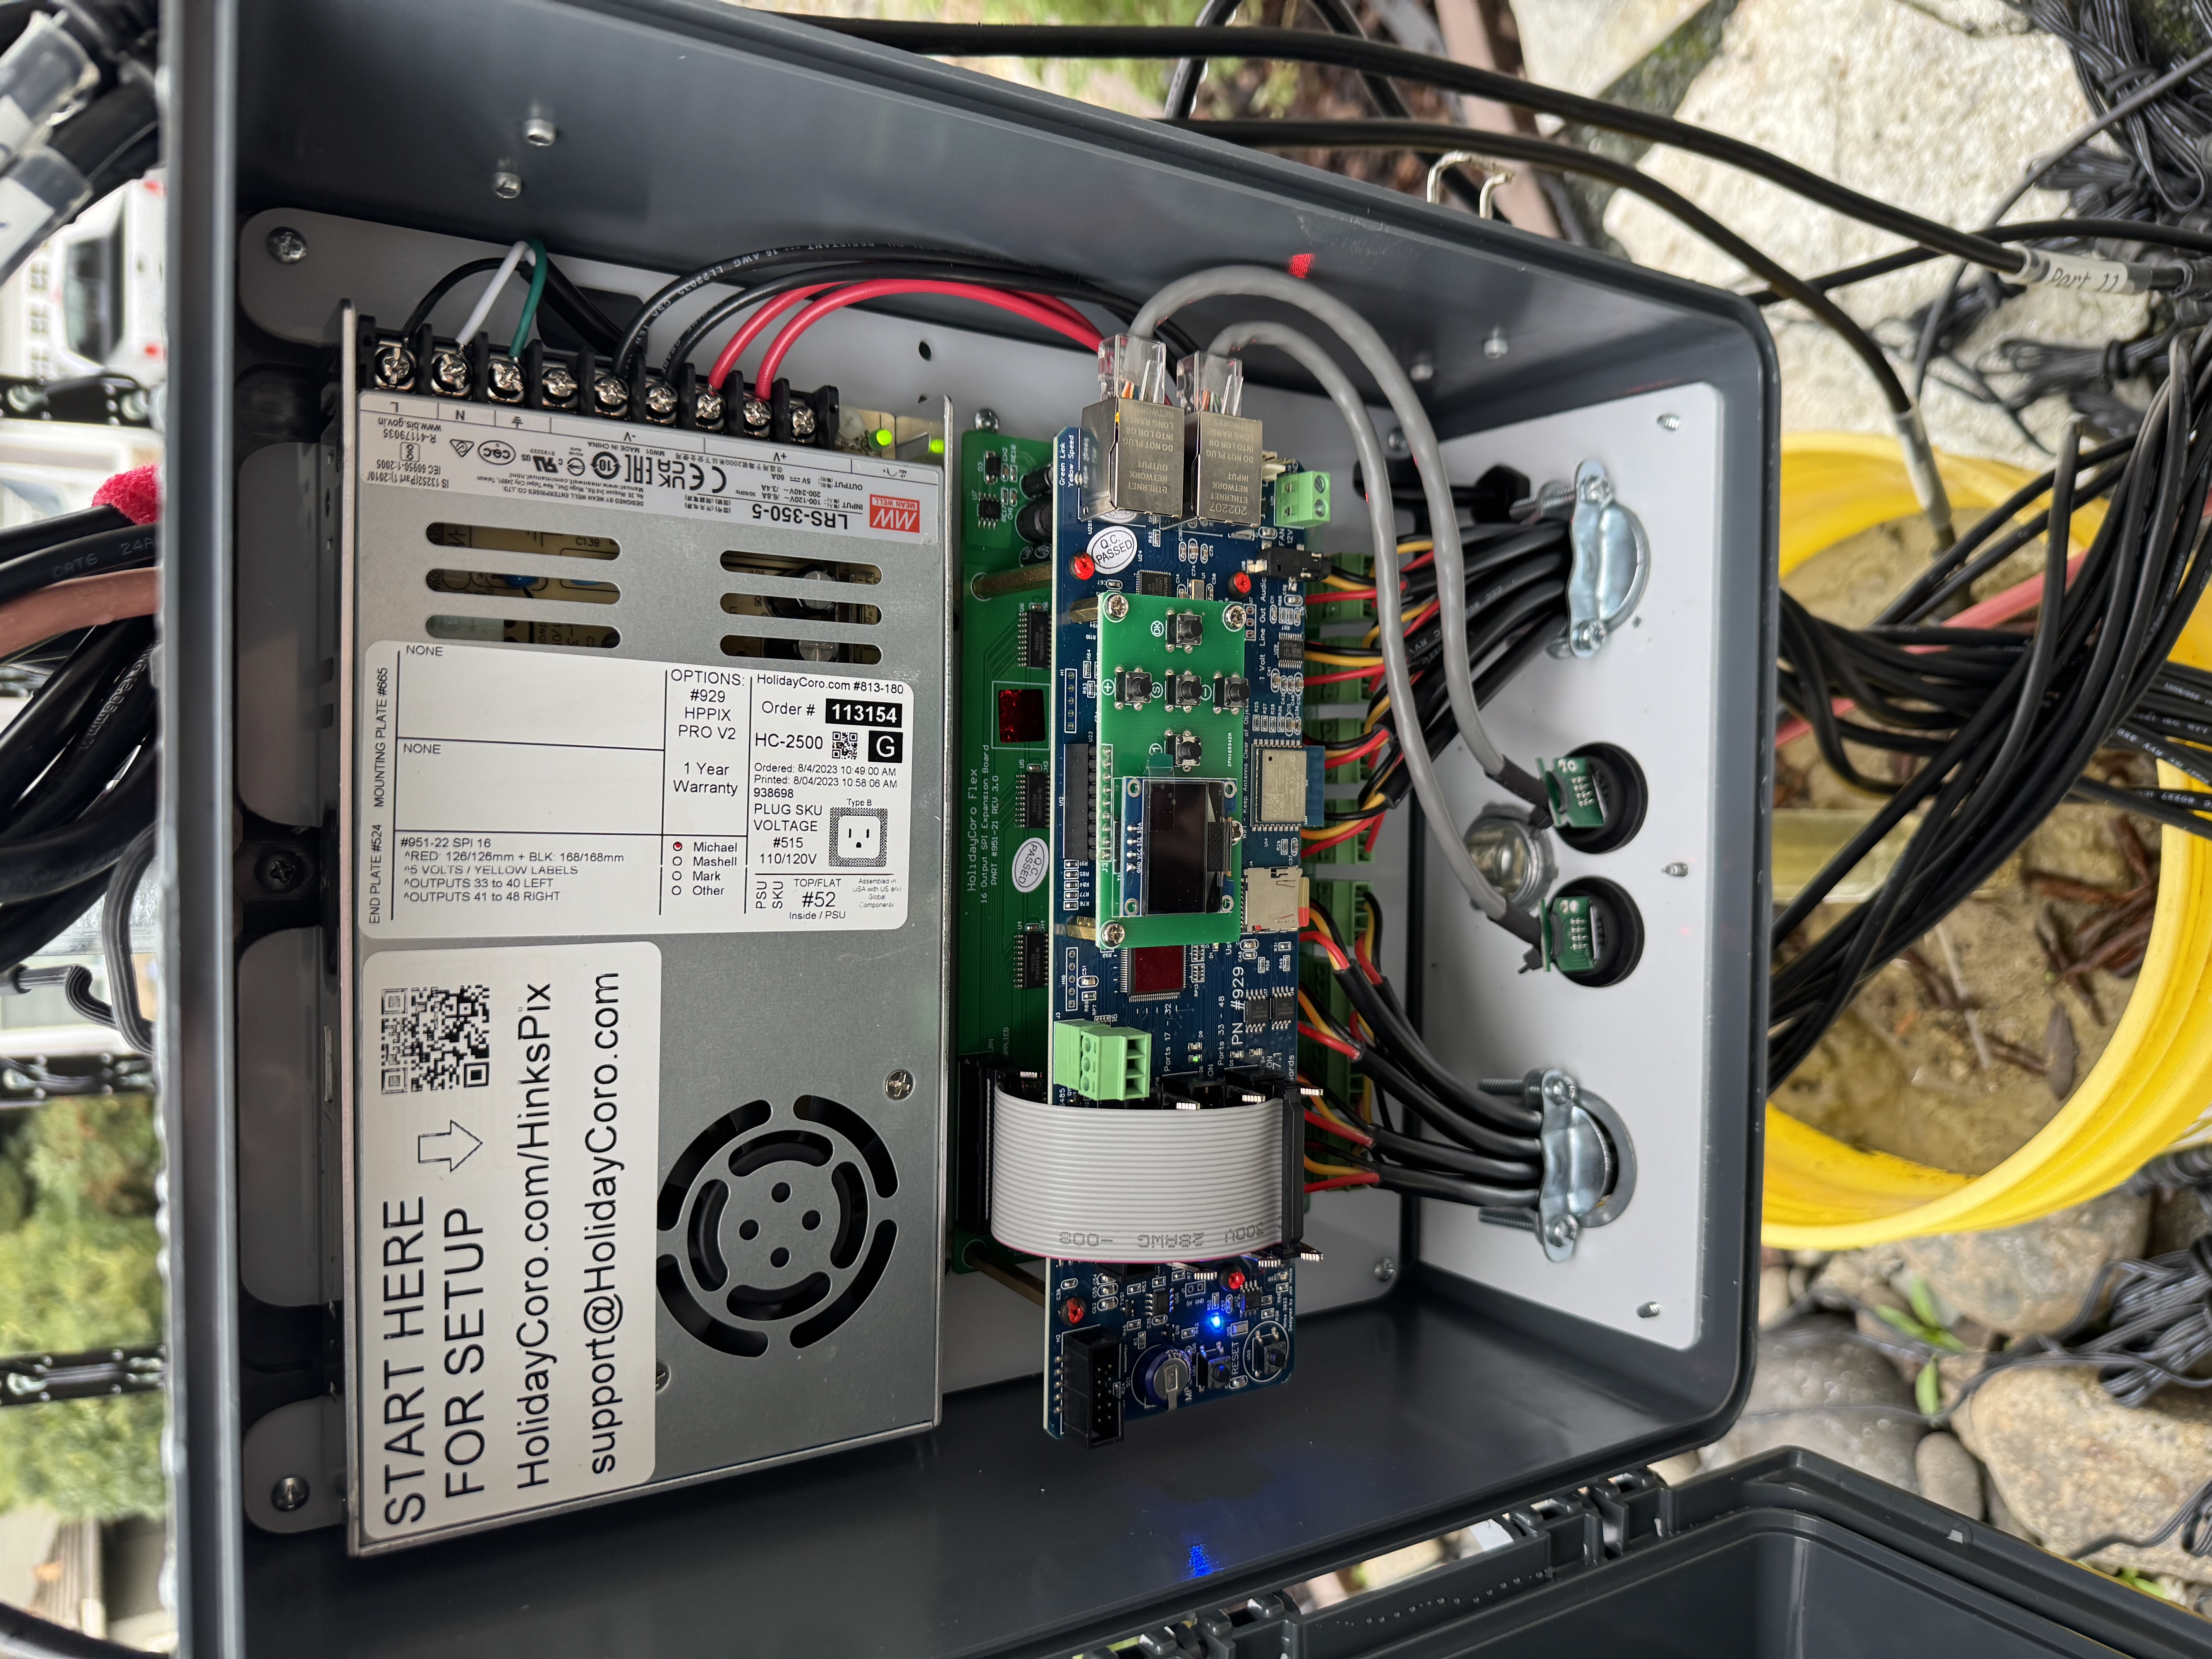
This is the simpler of the two; as mentioned, I purchased it as part of a tree kit (Quick Pixel MegaTree kit from HolidayCoro). It’s a HinksPix Pro with 16 ports; basically any 16 port controller will be overkill for this application, but it makes it super easy; I just connect an ethernet cable from the switch, attach to power provided by the smart switch (covered later), and it’s running.

Everything Else controller
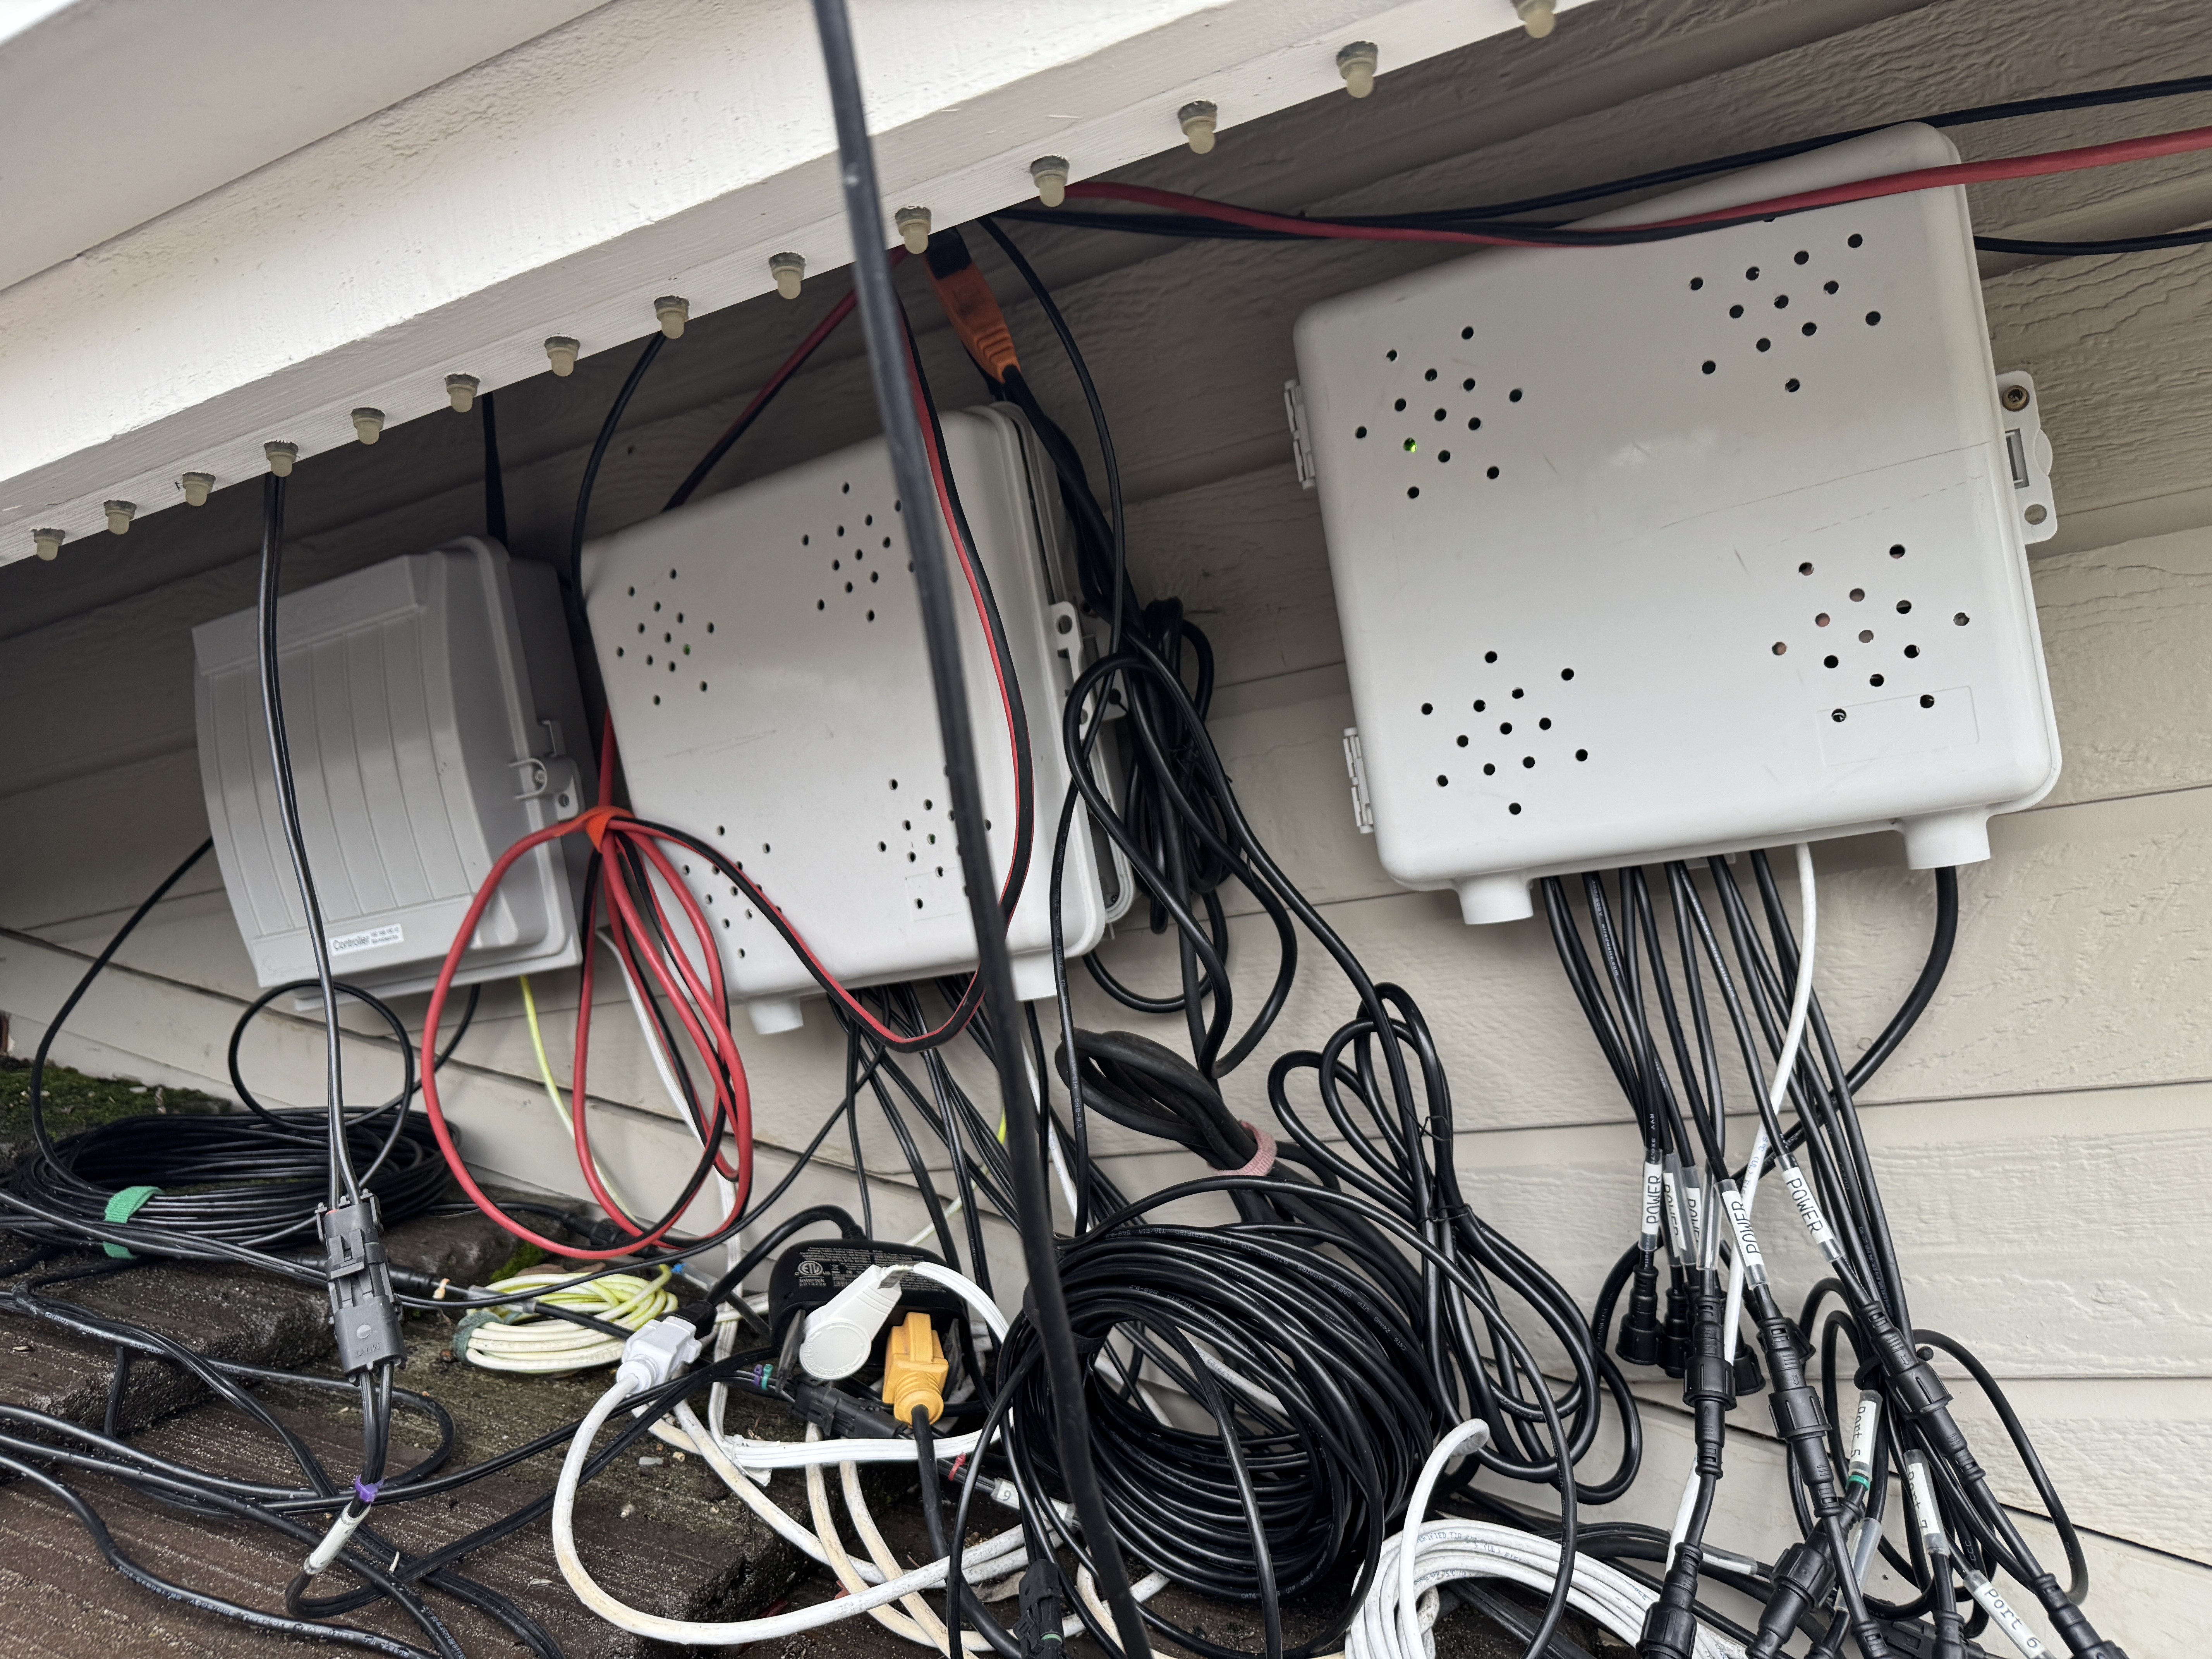
This was the first controller I got; a Falcon F4V2. It’s… fine. Unlike other boards, this one has 4 physical ports on it, but I’ve added an expansion board which allows me to connect up to 2 remote boards using ethernet, each of which also provide 4 ports, for a total of 12 ports; the white and black with a yellow zip tie are plugged in to the expansion board.
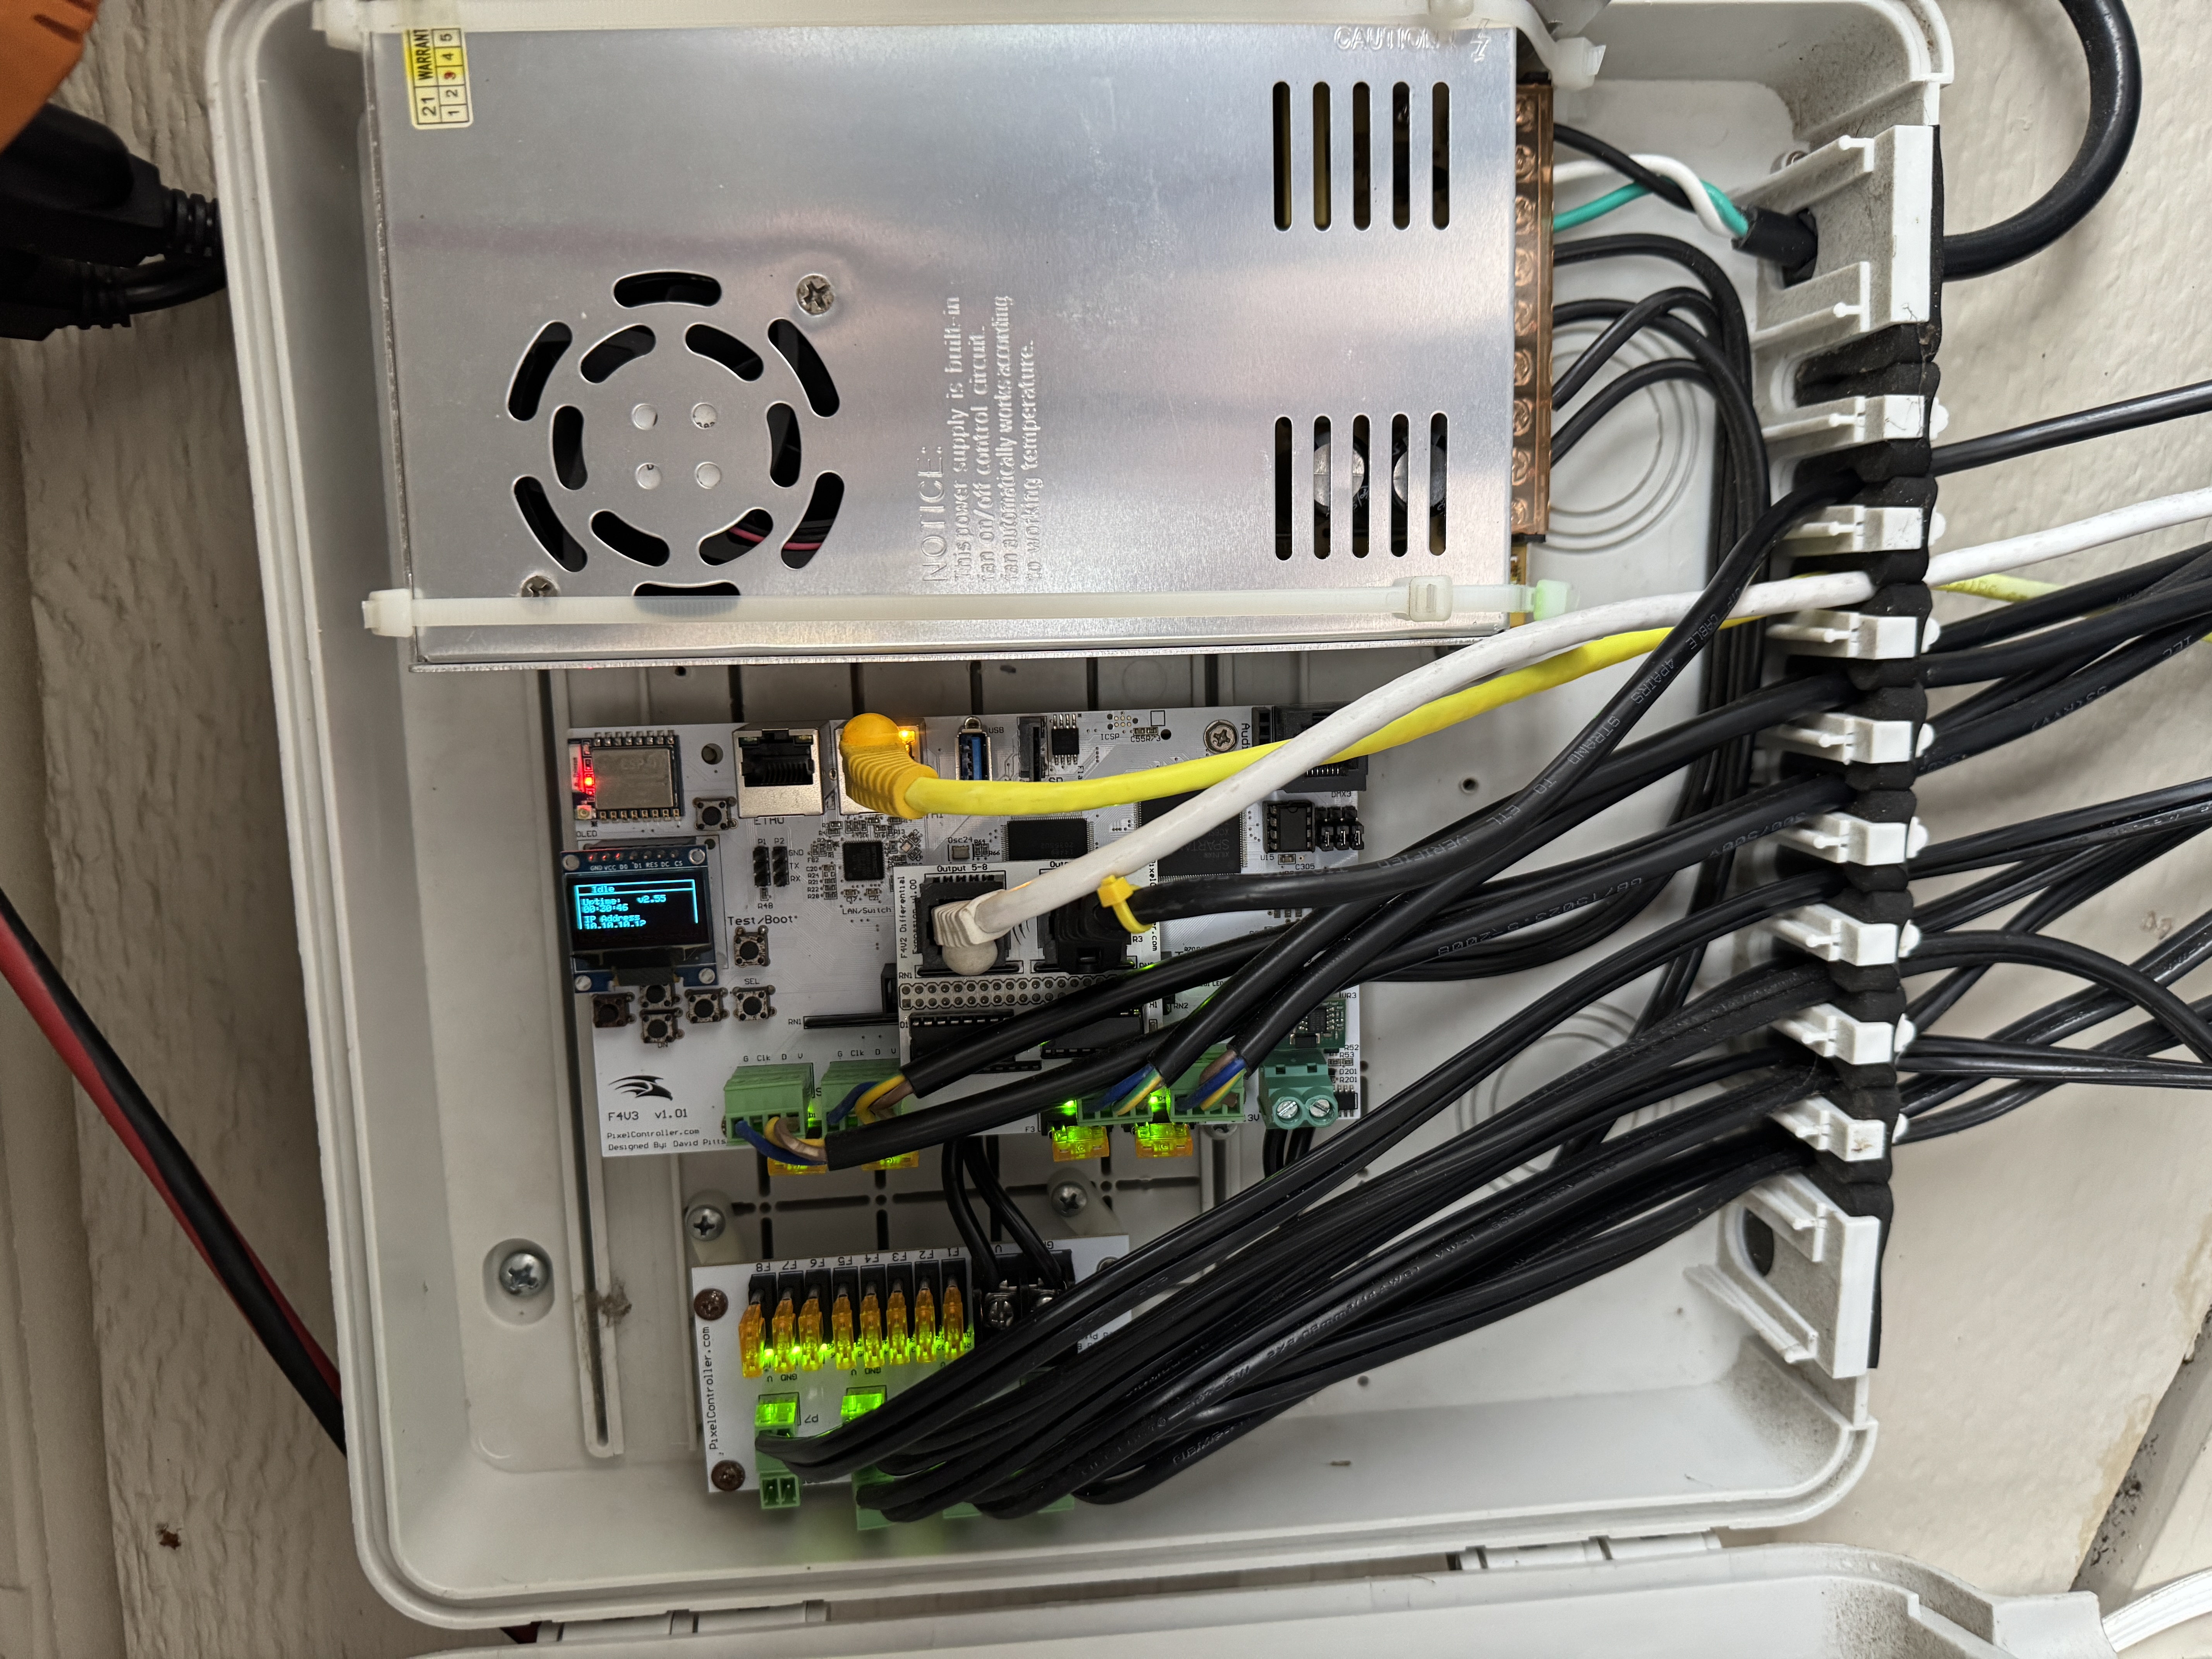
The children of this board are simple receiver boards - called Smart Receivers - in boxes with power supplies in them. They both look identical; one is in the eaves, and the other is on the mega tree pole; both are connected via ethernet.
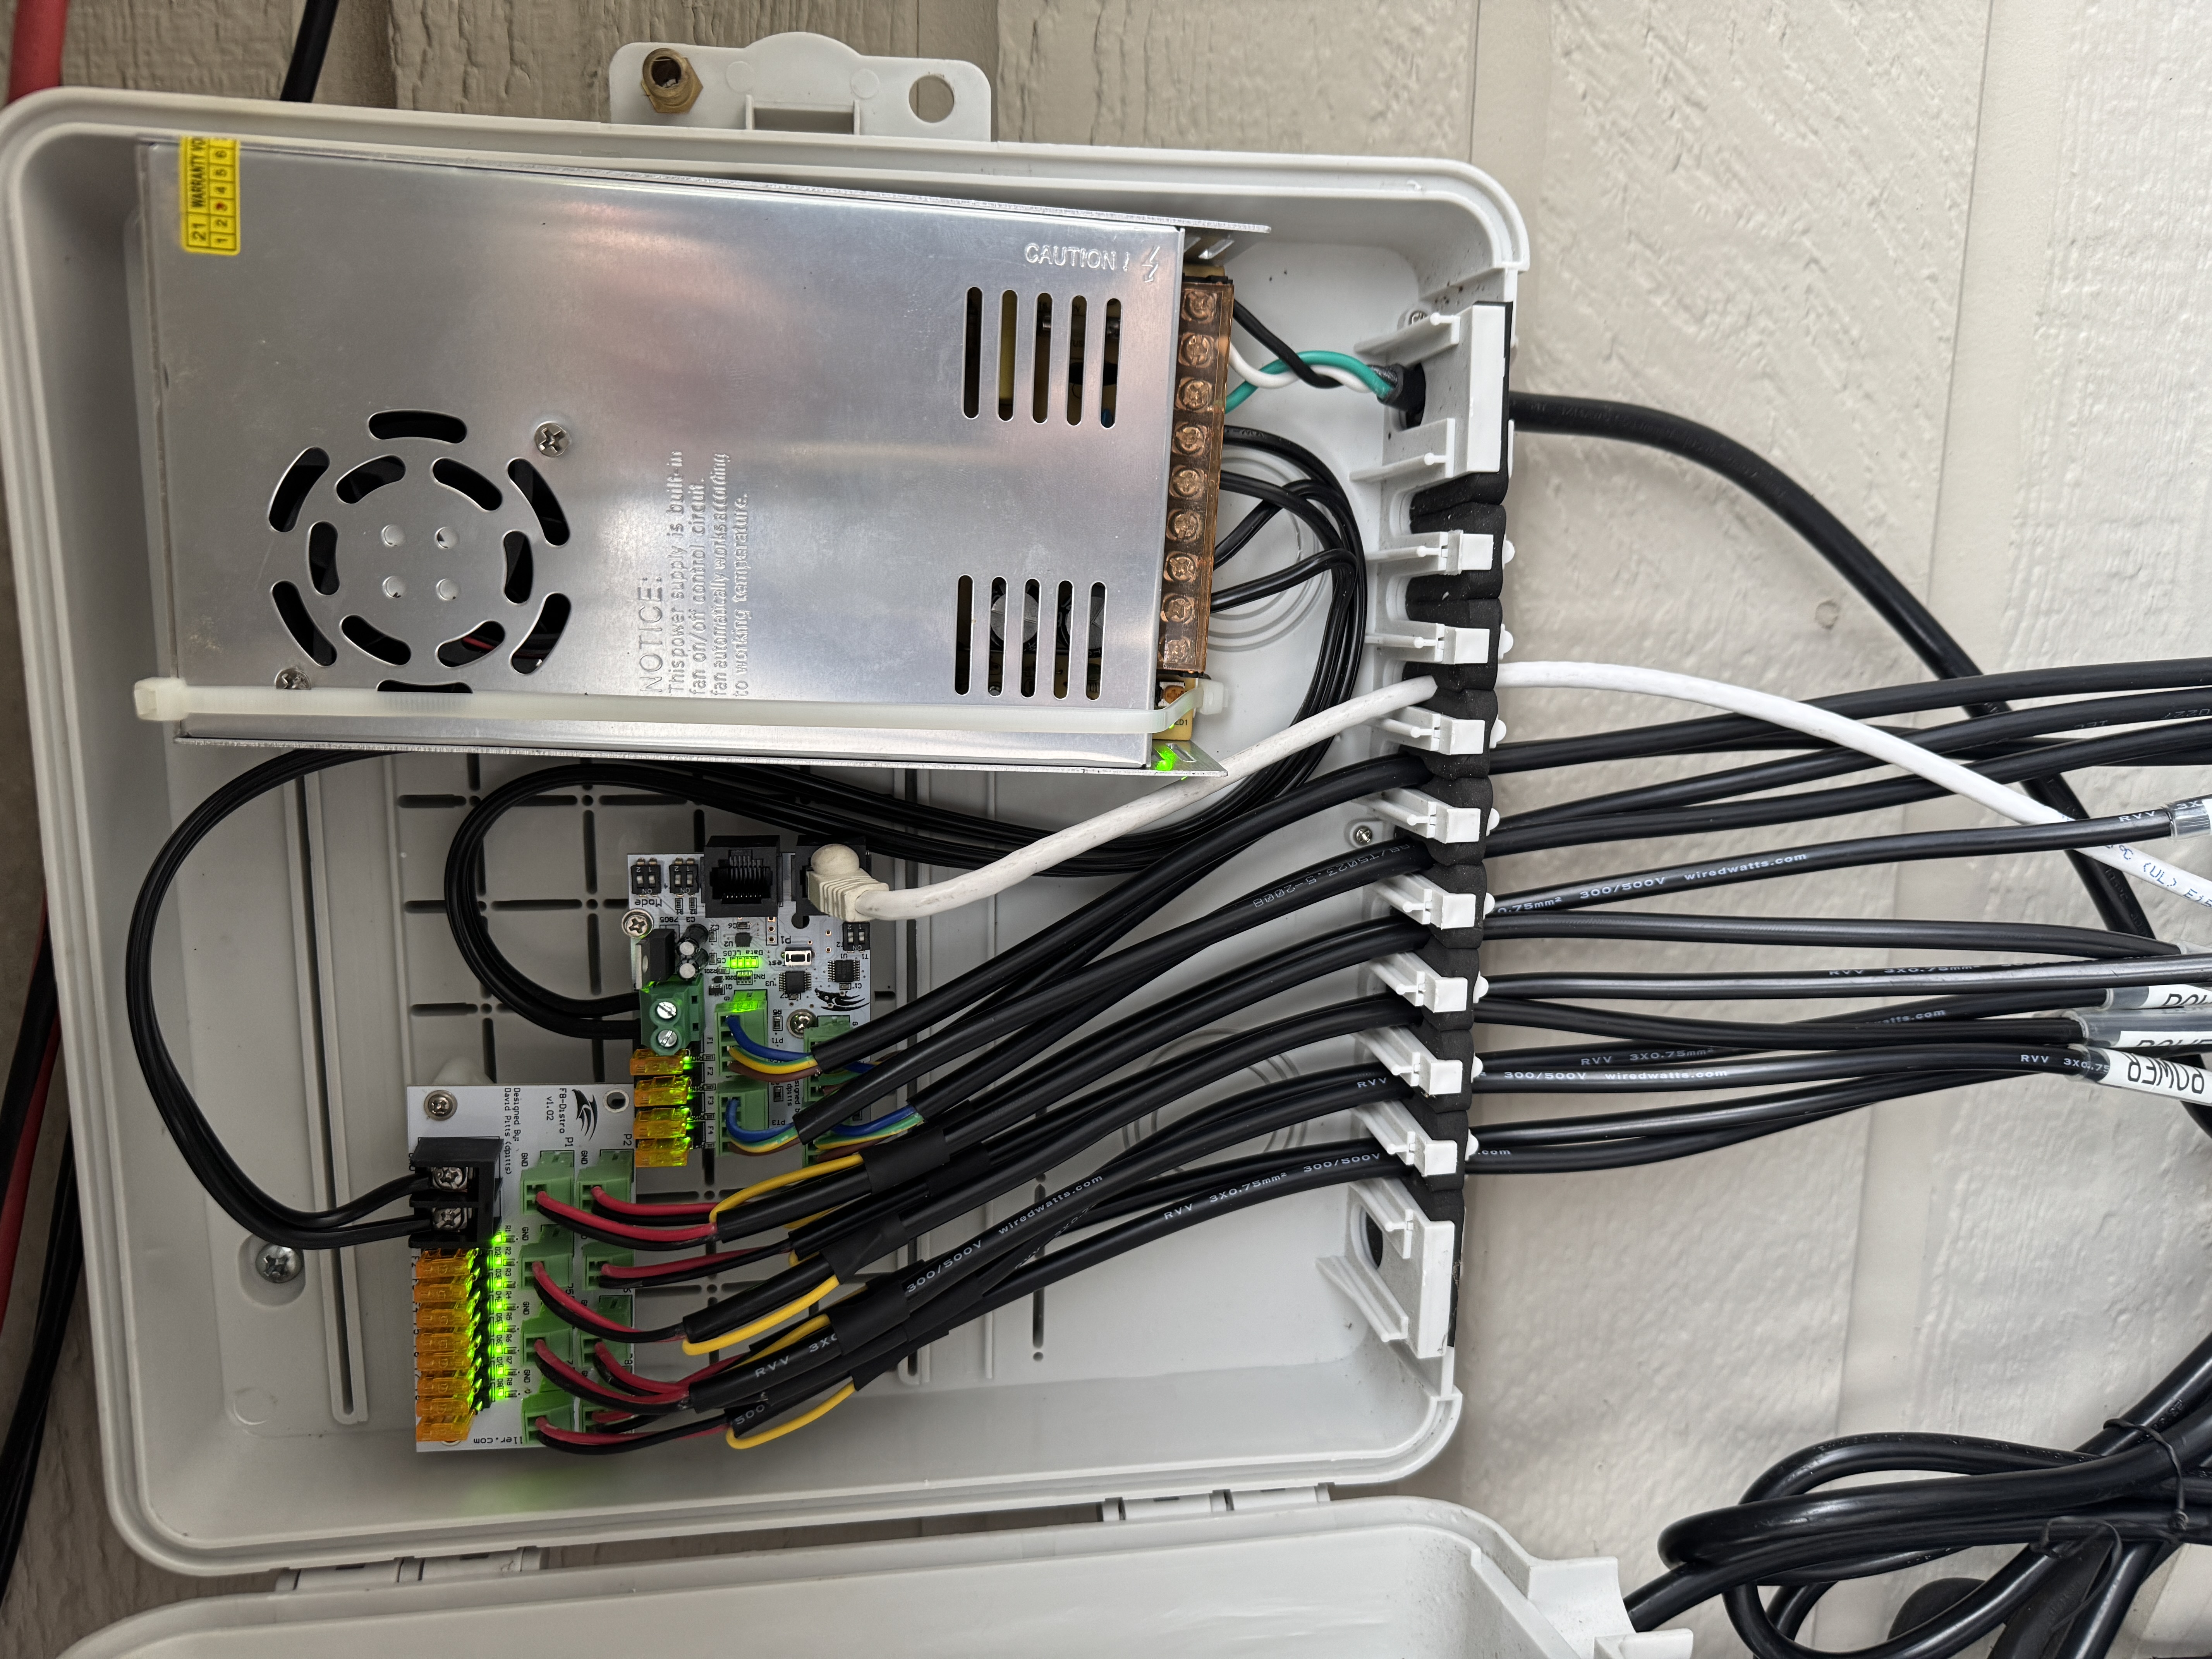
One thing to note in all of these “everything else” controller boxes is a power distribution board. As mentioned, each port can control ~600 pixels (simple math for now), but each port can only power ~300 pixels, so we have to do some power injection towards the back half of the line of props on the port. The power distribution block simply gives us a simple interface for adding those power injection cables. And, of course, the power supply, 5V at 300W.
How to improve
Hmmm, I think that’s it for the hardware and everything. So I should tell you what I don’t like. First on the list, the boxes. I like the one I got with the Hinks Pix a lot more than the other three I have, which are just too shallow. Plus, the box for the Hinks Pix has external plugs for network, which is nice.
Second, wiring. I would love to find a way to wire things up so I don’t have to run network cables and power halfway across the front of my house under eaves that are 12 feet off the ground. It’s super inconvenient and I have to put it up and take it down every year. This summer I swear I am going to improve this, and that’s different to last year when I said that, and the year before, and…
Third, all my stuff still works fine, but it’s several years old at this point; I think I owe it to myself to see if there’s something it makes sense to improve before something dies mid show.
Fourth, one thing that really helped was “power injecting” each prop into itself (I know that I said I wasn’t going to talk about props, but tough). When I first built my props, I had data connectors separate to power connectors, so every prop needed two connections. This was very bulky, very cumbersome, and a waste of money and time since I chose to build the connectors to “save money” (spoiler: I did not in fact save money). Last year, I rewired all my props so that the V+ and Ground wires at the input and at the output of the prop are connected to each other. In practice, that means that the first pixel and last pixel are the same distance and number of pixels away from the power cord instead of the last pixel being far away. If a prop has more than ~120 pixels, I’d also connect power somewhere in the middle, too. Basically, you don’t want any pixel more than 50 pixels away from a power source, else voltage drop gets bad; therefore, I just distribute the power from the input throughout the prop as needed so all pixels get about the same power. This also helps the power move along down the line of props since, from a power perspective, all the props are basically wired in parallel.
Wrap up
Okay, I think that’s about it; can’t think of anything else that would go in an overview. I can always update this post if I feel I missed something, But feel free to ask me if you do think of something.
Thanks for reading!